Schlagwortarchiv für: Fluxing

Additional information to the Article Flux Application: Electrostatic Fluxing

In dry flux application, the flux powder is electrostatically charged (typical voltage is ~ 100 kV) and applied to a grounded work piece. An electrical field results in flux deposition of the work piece. In practice, anisotropic distribution of the electric field can influence the homogeneity of powder coverage. At edges powder may accumulate, while penetration of powder into deep/thick fin packages (e.g., in case of double row tubes) can be limited by the Faraday cage effect.

Flux powder is electrically charged in the gun. However, it loses charge relatively fast when it hits the grounded heat exchanger. Therefore adhesion of the flux on the work piece is established rather by relatively weak Van der Waals forces than by electrostatic forces. Fine flux particles adhere better on the surface – but they are more difficult to operate with in the dry powder feeding system.

The relatively fine flux particles are more difficult to handle in dry powder feed systems compared to coarser paint powders – therefore the equipment used for electrostatic flux application is adapted to meet the specific requirements. Venturi pump, hose diameter, air flow and spray nozzle suitable for flux application are designed to minimize the possibility for powder buildup and clogging in the system. Powder transport within the hose system and the spray nozzle is further enhanced by introduction of additional air streams. The direction of the powder flow should always be from top to bottom. Sharp changes in flow direction must be avoided. In critical areas additional vibration units are installed to avoid powder buildup.

There are two types of powder feed systems established on the market (see the illustrations in the article):

The first type starts with the flux powder being fluidized in a fluidization vessel by compressed air that is fed through a porous membrane at the bottom of the fluidization vessel. The air going through the flux makes it behave like a fluid, since the powder is essentially diluted with air. A pick up tube attached to a Venturi pump is extended into the fluidized flux. Powder dosage is controlled by the volume of air flow through the pump. To optimize fluidization the vessel may additionally be equipped with a stirrer.

This type of feed system works perfectly well for classic electrostatic paints powders that are easy to fluidize, however, it may be difficult to establish a stable fluidization with ’standard‘ flux powder (i.e. the flux powder quality offered for wet/slurry-based flux application).

Fluctuations in density of the fluidized bed can result in inhomogeneous spray pattern (splashing) and might be a source for flux buildup within the system.

NOCOLOK® Flux Drystatic is optimized to minimize the challenges of powder feeding, while providing sufficient fine particle fraction for good adhesion properties.

The second type of powder feed system works on the principle of feeding the powder by a rotating helix screw (see the illustrations in the article above). Because of the mechanical displacement of the flux powder from the hopper, such devices minimize fluctuations of flux powder flow.

Most mechanical type of dry flux feed systems work with standard quality NOCOLOK® Flux as well as with special ‚Drystatic‘ grade NOCOLOK® powder.

To achieve flux distribution patterns for specific process needs (e.g., higher flux loads in tube to header areas, coating from both sides of thick cores), multiple spray nozzles are arranged for deposition of the necessary flux load at different locations of the heat exchanger.

Dry fluxing booths must be equipped with a filter system to collect the overspray. The overspray material is recycled within the booth. To avoid accumulation of impurities within the recovered flux, it is necessary to take care of the booth environment (i.e. avoid dust, fumes, and high humidity level) as well as for the quality of the compressed air used. Contamination introduced by the heat exchangers or the transport belt must be prevented as well.

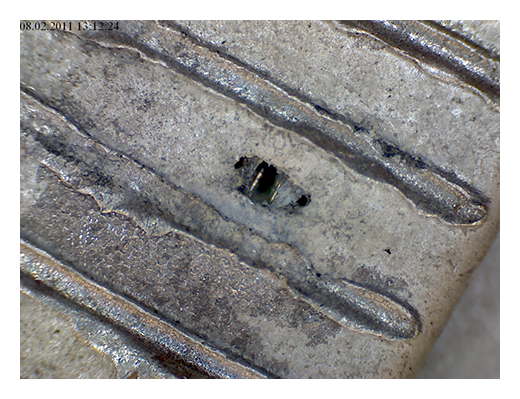
Due to the relatively weak flux adhesion (compared with wet- or paint- application methods), handling of dry fluxed parts should be done with special care to avoid flux fall off, especially at higher flux loads. To reduce flux fall off, some users perform electrostatic fluxing on heat exchangers with evaporative oils still present on the surfaces. Thermal degreasing in this case takes place after fluxing – just before the parts enter the brazing furnace.

Summary

The article was written on the basis of frequently asked questions from companies which either wanted to start a new all-aluminium brazing production of heat exchangers or wanted to convert from copper and aluminium mechanical assembly design to all-aluminium brazed parts. The questions were grouped into three main categories: Equipment (emphasis on assembling process), Process (emphasis on different fluxes and fluxing methods) and Corrosion.

Specific production challenges are also presented, which are important not only to newcomers of all-aluminium brazed heat exchangers, but to established companies as well. These include typical brazing problems such as managing leaks and the basics of brazing copper to aluminium. These topics are discussed by their relevance to the brazing parameters and their role in successful brazing.

Content:

  1. Introduction (Part 1, issue July 2013)
  2. Equipment (Part 1, issue July 2013)
  3. Brazing process (Part 2, issue August 2013)
  4. Brazing copper to aluminium (in this issue)
  5. Corrosion resistance (in this issue)
  6. Summary (in this issue)

4. Brazing copper to aluminium

When replacing a heat exchanger in an existing design, very often the connecting pipes are made from copper. Therefore the typical question: ”Is it possible to braze aluminium pipe to a copper one?” The answer is: Yes, it is possible by flame brazing. At 548°C there is the formation of a eutectic between copper and aluminium. This reaction is very rapid; therefore accurate temperature control and short process times such as with flame brazing are required. It is easier to braze at a temperature below the eutectic formation, thus lower melting point filler alloy and flux are required. In this case the recommended filler alloy would be ZnAl and Cs-Al-F flux. When copper remains in contact with aluminium for a longer period of time, such as in furnace brazing, an intensive dissolution of aluminium is observed. Therefore, for any factory which has production of copper and aluminium brazed exchangers, it is of very high importance to keep those two activities well separated from each other. A result of contamination of a condenser tube with a small chip of copper is shown in fig 7.

Fig. 7: Hole in a brazed tube surface burned through by a copper chip

Fig. 7: Hole in a brazed tube surface burned through by a copper chip

When joining copper to aluminium it must be remembered that extreme galvanic corrosion can take place when the joint is exposed to a humid or wet environment. It is therefore obligatory to make sure that Cu-Al joints are not exposed to water during service. This can be achieved for example by using temperature shrinking plastic sleeves over the tube joint.

5. Corrosion resistance

Corrosion resistance of condensers for air conditioning system is one of the major utility properties. Thus the first question: ”Is there any approved test for determining the corrosion resistance requirements for HVAC heat exchangers?” Unfortunately the HVAC industry has not yet developed a commonly accepted test standard for assessing corrosion resistance. In the automotive world, the most common tests used by manufacturers are:

  • SWAAT (ASTM G85 annex A3) – seawater acidified test, cyclic; it is an aggressive corrosion test commonly used in the automotive industry, but the characteristic of the test does not correspond well to the working conditions of stationary units.
  • Salt Spray Test (ASTM-B-117, ISO 9227), it is a test better reflecting the working conditions of stationary units, but it is not sufficiently aggressive (too long time for completion).

Other methods developed in response to observed corrosion due to rain or condensation water remaining on the units for a prolonged time, is the socalled soaking or water-exposure test. In this experiment a small cut-out heat exchanger section is immersed in demineralized water for a certain period of time and the concentration of ions in the water after soaking is analyzed. The procedure has not been standardized, therefore it is not really possible to compare results obtained by different companies, but the test can be used for direct comparison of different fluxes and materials. For now no correlation between its results and real life time has been established.

Invariably many companies when considering production of brazed aluminium heat exchange ask a question: ”What sort of alloys should be chosen for the best corrosion performance?” This topic is quite complex and there is no single “best answer”. In the authors’ opinion the best method is to discuss the subject with the aluminium suppliers who have a lot of knowledge and experience in choosing the optimal aluminium alloys. Every heat exchanger is an assembly of different components and when considering its corrosion resistance, the alloys of individual elements should be looked at as a unit in which mutual interactions between each component are taking place.

There are many different working environments which will significantly influence the corrosion behaviour of the parts. According to [8] the following major types can be distinguished:

Coastal/Marine:
This environment is characterized by an abundance of sodium chloride and sulphur compounds carried by spray, fog or winds.

Industrial:
This environment can be much diversified, where sulphur and nitrogen contaminants are most notable.. Many of the gases emitted during different combustion processes come back to the ground in form of acid rain. Also this environment produces a lot of different small particles in the form of dust which covers the equipment creating potential increased corrosion hazards.

Combination Marine/Industrial:
A combination of the above two factor create the harshest environment for any HVAC equipment.

Urban:
This environment is characterized by high level of automobile and house heating emissions. These are mainly SO2 and NOx compounds resulting also in acid rains.

Rural:
Usually these are unpolluted areas; however in some cases pollution may appear with higher a concentration of ammonia and nitrogen originating from animal excrement and fertilizer use.

The best solution would be to choose the alloys according to the different working environments; this however has hardly ever been possible.

As a mater of fact, [8] suggests that in particularly aggressive environment the coils should always have additional protection layer/coating.

6. Summary

Thanks to technical advantages of brazed heat exchangers over the mechanical ones and driven by high copper prices, it seems that a change into all aluminium heat exchangers in the HVAC&R industry is inevitable. Though the process of conversion from copper and /or mechanically assembled heat exchangers is in most cases a significant challenge, when properly planned it can be done smoothly without any unpredictable surprises. The major aspects which should be considered are equipment choices with a special emphasis on the assembly method, selection of proper alloys and the most optimal fluxing technology. The required data for the project and investment decisions can be obtained by direct contacts with equipment and consumables manufacturers.


References:

8. Selection Guide: Environmental Corrosion Protec-tion, Carrier Corporation, Syracuse, New York, July 2009

Summary

The article was written on the basis of frequently asked questions from companies which either wanted to start a new all-aluminium brazing production of heat exchangers or wanted to convert from copper and aluminium mechanical assembly design to all-aluminium brazed parts. The questions were grouped into three main categories: Equipment (emphasis on assembling process), Process (emphasis on different fluxes and fluxing methods) and Corrosion.

Specific production challenges are also presented, which are important not only to newcomers of all-aluminium brazed heat exchangers, but to established companies as well. These include typical brazing problems such as managing leaks and the basics of brazing copper to aluminium. These topics are discussed by their relevance to the brazing parameters and their role in successful brazing.

Content:

  1. Introduction (Part 1, issue July 2013)
  2. Equipment (Part 1, issue July 2013)
  3. Brazing process (in this issue)
  4. Brazing copper to aluminium (in September issue)
  5. Corrosion resistance (in September issue)
  6. Summary (in September issue)

3. Brazing Process

Brazing parameters

Success or failure of any controlled atmosphere brazing process is always connected with brazing parameters. These are:

Temperature: The brazed part should achieve a surface temperature between 590°C and 605°C and remain at that temperature range between 2 to 3.5 minutes. The temperature must be measured by thermocouples placed directly on the brazed parts. To obtain the above condition the furnace temperature controls must be set according to the size of the part. The usual maximum set value is in the range of 620°C. Note that the furnace set temperature will always be higher than the maximum temperature reached on the component.

Flux load and uniformity: The goal of fluxing is to achieve uniform flux coating with a load between 3 and 5 g/m2. For more difficult joints, for example tube to header joints, slightly higher flux loads are often used.

There are two major methods for fluxing: by spraying flux water suspension all over the assembled part and electrostatic fluxing where the dry powder is sprayed over the part in a process similar to powder painting. These methods are described in detail in [4]. Recently precoating with pure flux or mixtures which produce filler alloy as well, has become increasingly popular. Precoating with NOCOLOK® Sil Flux in particular is often used for air conditioning condensers and evaporators (MPE designs). Properties and challenges connected with this technology are described in [5]. The choice of fluxing method has big impact on the process machinery. The fact is that any of the above methods when properly conducted secure the required flux load and its uniformity. Therefore the decision about the fluxing choice should be based on a cost calculation. The calculation needs to take into account the following categories: media, maintenance, environment (cost of waste utilization), raw materials and consumables, labour and investment costs (depreciation). The result is always a function of local factors and conditions.

Fig. 3: Production steps for brazing line with standard wet fluxing and for NOCOLOK® Sil Flux

Fig. 3: Production steps for brazing line with standard wet fluxing and for NOCOLOK® Sil Flux

Furnace atmosphere: The brazing furnaces are delivered with various systems on nitrogen feeding nozzles. Therefore one of the most important questions is: ”What is the principle for setting the nitrogen flow through the brazing furnace?” This is shown in fig. 4.

Fig. 4: Schematic of continues brazing furnace with recommended nitrogen flow balance

Fig. 4: Schematic of continues brazing furnace with recommended nitrogen flow balance

Joint geometry: By joint geometry one should understand the gap size between the elements to be joined and also the shape of the joint. The gap size for at least one component clad with filler alloy should be no larger than 0.15 mm and it should be remembered that along the joint there must be at least one point of intimate contact between the joint elements. The shape of the joints should be designed in such a way that there are no preferential paths for the filler alloy to flow. This concept called “competing joints” is explained in details in [6].

Filler alloy availability: This parameter is best expressed by the question: ”How much of the clad alloy actually forms the joint?” It is a common belief that there is as much filler metal available as clad material is rolled on the base metal. This, however, is never the case! During the heating cycle there is always some diffusion of silicon from the filler alloy into the matrix which diminishes the overall volume of liquid formed at brazing temperature. Sometimes even with a thick clad layer, only a fraction of the filler volume flows to form joints. Such an extreme limitation of the available liquid filler metal is connected with a phenomenon called “Liquid Film Migration [LFM]”. It is a phenomenon of very rapid diffusion of silicon into the matrix alloy. It starts at temperatures below the brazing window. This creates a moving liquid interface, which sweeps from the clad/ core interface into the core of the material. In this way the volume of available clad is diminished – thus making filling the larger gaps much more difficult. The degree of LFM correlates with cold work induced to the base metal before brazing through forming, bending and stamping and also strongly depends on the alloy type of the part [7].

Fig. 5: Localized LFM on a manifold clad surface

Fig. 5: Localized LFM on a manifold clad surface

Cleanliness: A question often raised about cleanliness is: ”How do we determine if a part is clean enough for successful brazing?” The fact is that cleanliness is a parameter for which there is no practical quantitative measure. Therefore, it is rather controlled by experience and the so called “good industrial practice”. Quite often an examination of the parts either before or after brazing is not sufficient to determine that the parts were not clean enough. Optical microscopy of the brazed joint or an investigation by Scanning Electron Microscope, in most cases determines if the root cause of the failure was connected with cleanliness. Sometimes insufficient degreasing or binder removal can be the reason for lack of braze (see fig. 6).

Fig. 6: Lack of braze due to insufficient cleanliness of one of the joint surfaces

Fig. 6: Lack of braze due to insufficient cleanliness of one of the joint surfaces


References:

4. Hans W. Swidersky, “Aluminium Brazing with Non-Corrosive Fluxes – State of the Art and Trends in NO-COLOK® Flux Technology”, 6th International Confer-ence on Brazing, High Temperature Brazing and Dif-fusion Bonding (LÖT 2001), Aachen, Germany (May 2001)

5. Leszek Orman, Hans W. Swidersky, ”Interaction of NOCOLOK® Sil Flux with Aluminum Base Alloy at Various Conditions”, AFC- Holcroft 12th International Invitational Aluminum Brazing Seminar 2007

6. Ralph Woods “CAB Brazing Metallurgy”, AFC- Holcroft 12th International Invitational Aluminum Brazing Seminar 2007

7. Aad Wittebrood, “Microstructural Changes in Brazing Sheet due to Solid-Liquid Interaction” Corus Technology B. V., ISBN: 978-90-805661-6-3

Will be continued…

Selective Pre-Fluxing with Adhesives – Fashion or Progress

Summary

Over the last 15 years, selective prefluxing – also called paint fluxing or binderbased fluxing – has evolved as an alternative method for applying flux powder in the aluminium brazing industry. There are many activities to define process parameters of fluxing with adhesives.

The first part of this paper outlines key features of prefluxing. The methodology for measurements of physical characteristics of binders and paint flux mixtures are described. General rules for behaviour of flux paints in brazing process are discussed together with some examples of flux paint features.

In the second part a case study is shown to illustrate common challenges when brazing with flux paint. The third and last part of this paper provides a cost comparison as guidance for choosing the right fluxing method for two different cases, one being extremely negative and the second as a positive case.

4. Flux Paint Risk Point

The fundamental condition for successful brazing is having a substrate surface which is well wetted by a molten filler alloy. Any binder as an organic compound contains carbon. This carbon must be removed before brazing, otherwise it will form a very thin deposit on the substrate surface preventing wetting by the molten filler alloy2. When the flux paint is deposited on open surface areas, like for example on the radiator headers, there is no issue to remove the binder by evaporation at higher temperature. However, when the flux paint is applied in enclosed spaces, like for example on inner surfaces of condenser manifolds, the removal of binder becomes challenging. Proper de-bindering conditions must allow the binder fumes to escape completely. Residual binder – like any other trace organic – carbonizes during the brazing cycle – causing surface discoloration and potentially poor brazing.

Fig. 5 shows a leak in the tube apex. The condenser manifold was made of two halves: cover and header. Only the cover part was prefluxed by immersion. Composition of the flux paint: flux ~ 30%; carrier (acetone) ~ 62%; binder (polymethyl methacrylate) ~ 12%.

Fig. 5: Leak in tube to manifold joint in condenser with manifold half flux painted by immersion.

The gap size between the tube and manifold is in the range of 40µm, which is well within the maximum recommended tolerance.

Fig. 6: Dark field image of the non brazed tube to manifold joint.

Dark field image of the non brazed joint showed that the gap is filled with transparent substance. Investigation by Scanning Electron Microscope revealed that the joint was completely filled with post braze flux residue.

Fig. 7: Mapping of potassium in the non brazed area of the joint.

The tube surface presented in Fig. 7 shows very uneven flux distribution. There are areas completely free of potassium (flux) and areas covered with a layer of flux. This would indicate that the tube surface was not completely wetted by flux upon application. Such “poisoning” of the surface can appear when it is contaminated with carbon. Though the overall level of carbon (as examined be SEM) is low, its distribution is uniform. The carbon most likely originated from binder traces. It seems that during debindering treatment the carbon got embedded into the aluminium oxide layer. Such a modified aluminium oxide layer is more difficult for the flux to remove.

5. Example of cost comparison calculation

The major reason behind the decision to introduce flux painting technology should be reduced overall cost of the manufacturing process. These should include:

  • Media
  • Maintenance
  • Environment (cost of waste utilization)
  • Raw material and consumables
  • Labor
  • Investment cost (depreciation)

In the following section we will present two examples of such calculations. It must be pointed out that the quoted numbers, though not far away from the values one can see in an aluminum brazing factory, may always differ from case to case. Thus the presented calculations should be considered only as a tool in which individual data needs to be fed, not as an indication which fluxing method is better.

Case A: Condensers

In the modified condenser production, the tube to fin joints are realized by tube precoating with NOCOLOK Si Flux3 – while the manifolds are prefluxed with a water based flux paint. This concept allows for complete elimination of the fluxer and the thermal degreaser from the brazing line. The dryer then acts as preheat and oven, where partial debindering takes place.

Fig. 8: Standard and modified process flow for condenser production.

Table 3 shows assumed input values like for example cost of electricity and the difference between the cost of standard process and modified one in the above listed categories. The whole calculation is done in an excel table where one can play with different input data which shows how sensitive the overall cost is to a change in a given parameter. In this case analyses showed that the most sensitive factor is the cost of the Sil Flux precoated tubes. Change of price in tube material by 10% can entirely reverse the final result.

Table 3: Example calculation for standard and modified condenser manufacturing. Production level 200 pcs/hour.

Case B: Charger Coolers

Charge Air Coolers have one characteristic feature. Inside the tubes there are turbulators to make the flow of the hot compressed air more turbulent to increase the transfer of heat from the air to the tube walls. A condition to secure sufficient tube resistance to the inner pressure is to have all turbulators uniformly brazed to the inner tube surface. This requires fluxing of the tube’s internal surface. The most robust method is fluxing by immersion. This however produces higher post brazed flux residue levels and it is usually a bottle neck in the continuous production flow.

The other method is to apply a high pressure spray of flux slurry across the tubes. When combined with cross blow of high pressure air it secures proper inner fluxing even up to 900mm long tubes. This method does not slow down the production flow in a continuous line. For comparison the latter cross spray fluxing method is compared with prefluxing of turbulators. It should be remembered that wet fluxing is applied on tube to fin joints in both cases.

Fig. 9: Standard and modified process flow for charger coolers production.


Table 4: Example calculation for standard and modified charge air cooler manufacturing. Production level 200 pcs/hour.

In this example there is no major change in the brazing line and as a matter of fact an additional entirely separate operation is added. This situation is somewhat improved when the flux painting process of the turbulators is incorporated into the tube making unit; however it eliminates only the negative effect of additional labor. The major cost is connected with consumption of flux paint. On average the cost of flux paint is about 20% higher than the cost of flux. Assuming liquid flux paint consumption of 4 grams per one turbulator and 50 grams of flux powder used on one charge air cooler fluxed by cross spray we will end up with such high difference in cost. In spite of this fact there are production lines which use the flux painting applied on turbulators.

6. Summary and conclusions

During recent years, the concept of prefluxing with binder flux/ paint flux has become quite popular as a method for fluxing. However when taking a decision about choosing this technology, the following aspects should be considered:

  • What level of adhesion is required?
  • Are we going to deal with binder removal from enclosed spaces?
  • Is the binder vapor going to affect my equipment?

and the most important one:

  • will there be real cost benefits?

In the case of cost calculations for NOCOLOK Sil Flux coated extruded condenser tubes the major factor influencing the overall cost is the cost of the coated tubes. Though the presented calculation is only an example and can slightly vary from case to case, it is the authors‘ opinion that in certain cases the introduction of this technology can be justified by cost savings. In the case of flux painted turbulators for charge air coolers, the major factor influencing the overall calculation is the cost of flux paint. It seems that such process is not always justified from the cost point of view.

7. References / Literature

1 Swidersky, H. W., Aluminum Brazing with Non-Corrosive Fluxes – State of the Art and Trends in NOCOLOK Flux Technology, Tagungsband, Hochtemperaturlöten und Diffusionschweißen, DVS-Berichte Bd. 212, Düsseldorf: DVS-Verlag, pp. 164-169, 2001

2 Hawksworth, D. K., A Study of Organic Residues on the Surface of Vacuum Brazing Sheet, 2nd International Congress Aluminium Brazing, Düsseldorf 2002, conference proceedings

3 NOCOLOK Sil Flux: fine grade and extra fine grade

Selective Pre-Fluxing with Adhesives – Fashion or Progress

Summary

Over the last 15 years, selective pre-fluxing – also called paint fluxing or binder-based fluxing – has evolved as an alternative method for applying flux powder in aluminium brazing industry. There are many activities to define process parameters of fluxing with adhesives.

The first part of this paper outlines key features of pre-fluxing. The methodology for measurements of physical characteristics of binders and paint flux mixtures are described. General rules for behaviour of flux paints in brazing process are discussed together with some examples of flux paint features.

In the second part a case study is shown to illustrate common challenges when brazing with flux paint. The last part of this paper provides a cost comparison as guidance for choosing the right fluxing method for two different cases, one being extremely negative and the second as a positive case.

3. Overview of Binders

Group Adhesion providing components Co-solvents / dispersion agents (examples only) Carriers / solvents
1 Polyurethane (aqueous polyurethane dispersion) N-Methyl-2-pyrrolidon water
2 Water-based acrylic 3-Methoxy-3-methyl-1-butanol water
3 Solvent-based acrylic 1-Methoxy-2-propyl acetate and others Preferably non-explosive and non-flammable organic solvents (e.g. esters of dicarboxylic acids)

Table 1: Main groups of flux binders / flux paints.

One of the most important characteristic of a binder is the kinetics of binder removal. This property is measured by a method called Differential Thermal Analysis [DTA]. The specimen (binder or flux paint) is placed in a small crucible and heated with a preset rate. The device measures the change of weight of the specimen and heat emitted or absorbed by the sample. The test can be done in air or at a chosen gas atmosphere.

An example of the curves obtained in such device is shown in Fig. 1

Fig. 1: DTA curves obtained from solid flux paint sample. Test performed in air. 

The upper curve represents lost of weight upon heating, and the lower curve represents thermal effects appearing in the heated sample. The endothermic effect is associated with evaporation of the sample and the exothermic effect is usually connected with burning of the sample.

It should be observed that the above curves represent a sample of liquid flux paint. The removal of the the liquid phase (carrier evaporation) takes place during curing of the painted part. This process is always done before putting the parts into the brazing line. For flux paints made with water as a carrier it is simple evaporation.

Removal of the solid phase (cured binder) takes place at much higher temperature then evaporation of the carrier. It usually happens in the brazing line – in the dryer and partially in the brazer. Kinetics of the solid phase removal is shown in Fig. 2. In this case the analyzed sample is prepared by painting a metal surface, curing the paint and careful scratching off the solid paint, which is then analyzed in DTA device.

Fig. 2: DTA curves obtained from liquid flux paint sample. Test performed in air. 

As can be seen the end of the binder removal is in the temperature range of 450oC. The above presented curves show the removal of binder at a constant heating rate of the sample (in this case 10oC/min). In the brazing line the prefluxed parts firstly go through a dryer where the temperature for dry parts is usually in between 200oC to 250oC. The parts for a continuous brazing line usually stay in the dryer no longer than 10 minutes.

To simulate this condition, a dry flux paint sample was analyzed by DTA with a hold for 10 minutes at 300oC. As can be seen from Fig. 3, holding at constant temperature for a prolonged time does not lead to full removal of the binder. In the given case only about 36% of the binder was removed.

 Fig. 3: DTA curves with holding time 10min. at 300oC Test performed in air.

Different furnace design and different size of the brazed parts are responsible for different heating kinetics in the brazing lines. An influence of different heating rates on kinetics of binder removal is shown in Fig. 4.

Fig. 4: DTA curves with different heating rates Test performed in nitrogen. 

The curves presented in Fig. 4 were obtained from analyzing a polyurethane binder heated in nitrogen atmosphere. It can be seen that only the middle temperature is moved to higher values with increased heating rate. The beginning and end of the debinding process do not depend on the heating rate.

Several examples of debinding temperatures for different type of binders are presented in table 2.

Binder Type Tested in Air Tested in Nitrogen
Middle temp. [°C] End Temp. [°C] Weight loss [%] Middle temp. [°C] End Temp. [°C] Weight loss [%]
Polyurethane Binder A 355 530 99.7 370 460 99.6
Polyurethane Binder B 360 550 98.5 370 460 97.5
Acrylic Binder C (water soluble) 317, 382 450 87.2 220, 387 430 85.2
Acrylic Binder D (high adhesion) 267 420 Not measured* 385 Not measured* 27.5
Acrylic resin Binder E 275 400 86.9** 370 450 89.3**
* DTA performed only on ready mixtures
**Lower values due to some flux residue (sample obtained from ready mixture)

Table 2: Examples of debinding temperatures for different types of binders.

Will be continued soon.

Preparation

In the simplest operation, the lid is removed and flux is manually scooped out of the drum (with a  large plastic scoop) and added to the flux slurry reservoir tank. The flux should always be added to water and never scooped into an empty tank. Aerosolization should be controlled by a local exhaust ventilation system (LEV). The operator will likely need to wear a dust respirator and PVC gloves, goggles and an adequate protective coverall.

For large volumes of flux slurry preparation, it is also common to dump the entire drum contents into the reservoir with a forklift truck. Again, care should be taken to avoid dusting and aerosolization.

All slurries must be agitated to hold the flux particulate in suspension. Allowing the flux particles to settle out in the mixing tanks or containers will result in inconsistent flux loadings. During a shutdown period (maintenance, holidays etc.), the agitators may be turned off. Upon start up, it must be ensured that all settled flux is brought back into suspension prior to starting the fluxing operation. Ideally, the flux slurry should be slowly agitated during shutdown for ease of start-up.

Agitation

Since the flux is insoluble in water and the goal is to keep the flux in suspension, the natural tendency is to use high agitation speeds which creates high shear forces. The high shear forces will break up particles of flux and over time (even a few hours), shift the particle size distribution to smaller particles, even to the sub-micron range. These very small particles tend to be „sticky“ and when collected in one place, will acquire a gel like appearance. Furthermore, once the flux has acquired this sticky property, it is very difficult to bring this flux back in suspension after a shut-down period.

These effects may be seen even if the speed of the agitator has not changed, but the slurry consumption has decreased (e.g. one less work shift per day). In other words, the same flux is being agitated for a longer time than before and therefore may be shifting to a smaller particle size as a result of the increased residence time in the tote.

The key to agitation for flux slurries is low speed – low shear agitation to just keep the flux in suspension. Faster is definitely not better when it comes to keeping the flux slurry suspended.

Flux which has acquired a gel like consistency caused by high shear stresses may lead to strainer clogging. Even if the individual particles are small enough to pass through the mesh, once one particle sticks to the screen, others will stick to it and eventually accumulate to such an extent as to clog the strainer. Gelled flux is very difficult to bring back into suspension because it does not break up easily – the flux sticks to itself. This gelled flux will clog a small mesh size strainer in no time at all. The stickiness of sub-micron particle size flux has been associated with many blockages and is often seen to clog nozzles.

Large agglomerates are most often formed by the flaking off of flux that has dried on the walls of the spray cabinet or other nearby structures such as exhaust hoods. The best practice to avoid the formation of these agglomerates is to have a regular clean-out procedure. When this practice is not carried out, flux solids will settle out within individual droplets and form clumps or agglomerates. These agglomerates can be very hard and are also often associated with blockages.

Selective Pre-Fluxing with Adhesives – Fashion or Progress

Summary

Over the last 15 years, selective pre-fluxing – also called paint fluxing or binder-based fluxing – has evolved as an alternative method for applying flux powder in aluminium brazing industry. There are many activities to define process parameters of fluxing with adhesives.

The first part of this paper outlines key features of pre-fluxing. The methodology for measurements of physical characteristics of binders and paint flux mixtures are described. General rules for behaviour of flux paints in brazing process are discussed together with some examples of flux paint features.

In the second part a case study is shown to illustrate common challenges when brazing with flux paint. The last part of this paper provides a cost comparison as guidance for choosing the right fluxing method for two different cases, one being extremely negative and the second as a positive case.

1. Introduction

In aluminium brazing industry fluxing is one of the most important steps in the production process. Flux water slurry application is considered as a standard and as a matter of fact very robust methodi. We believe that about 70% of overall fluxing activities are done by flux water slurry spray. This method has however certain disadvantages like troublesome slurry preparation and requirements for large and sometimes expensive machinery.

In order to lower production costs, new fluxing technologies have been introduced. One of them is called paint fluxing or binder-based fluxing which allows for elimination of wet fluxing process from the brazing line. Actually, the prefluxing process can be even done by an external company/subcontractor. It is nevertheless still a process of coating, which is done to particular component surfaces of the whole assembly – usually before the components are assembled.

In the industrial practise – particularly when one is in contact with many different users of the prefluxing technology – it is quite important to define the basic features and properties of discussed technology.

Flux Painting Booth

Flux Paint:
A mixture of brazing flux with binder, demineralised water or organic solvent, and thickener (the latter not always obligatory)

Binder:
Organic complex compounds, which are activated by curing – to provide adhesion of flux particles to the painted surface.

Thickener:
Organic substance, which is used to adjust viscosity and to facilitate re/mixing of the flux paint.

Curing:
Drying of the painted parts – usually with a blow of hot air (about 150°C). During that process liquid carrier (water or organic solvent) is evaporated and binder becomes activated to provide adhesion.

Adhesion:
Qualitative or quantitative measure by which strength of the flux particles bonding to the painted surface is determined. There are many different methods to describe adhesion of the flux paint. At Solvay we are using a simple quantitative method: A coated and cured coupon is placed in a holder positioned on a scale, a steel wedge is moved along the coupon with a gradual pressure increase. The weight at which the first scratches appear is a numerical value for adhesion.

Debinding:
Removal process of the binder from the painted surface done by treatment with high temperature, either in air or in ambient atmosphere.

Binder must be removed before reaching brazing temperature; otherwise the carbon residue will interfere with the brazing process – leaving both black stains on the part surfaces and very often leading to lack of brazing. Removal of the binder is done by applying high temperature to the assembled parts. In most cases the process of binder removal is realized in the brazing line both in the dryer and brazer.

2. Basic Rules for Flux Painting

The process of coating can be done by spraying, roller coating, brushing, or dipping. Uniformity of coating is very important, any agglomerates and lumps must be avoided. The flux paint can be prepared without thickener. Practically it is required in the mixture when a longer storage is expected (i.e. more then few days). There is an optimal temperature for curing resulting in maximum adhesion. Curing at ambient temperature is possible, but it will yield lower adhesion. Curing at too high temperature can lead to significant loss of adhesion.

Apart from the curing condition, adhesion also depends on the ratio of binder in the mixture (the more binder in the mixture the stronger adhesion), and the type of the binder (as a rule of thumb: the higher flash point of the binder the stronger adhesion). The most common method for prefluxing with binder mixture is using an atomized spray method on a machine which performs degreasing, painting and curing.

Will be continued soon.

This technique, also known as dry fluxing is gaining popularity as an alternative fluxing practice and therefore will be described here in some detail. Dry fluxing is a technology whereby the flux is electrostatically charged and applied to a grounded work piece, in our case a heat exchanger or individual heat exchanger components. The electrostatic attraction causes a layer of flux to be deposited on the work piece. A typical flux application system consists of a powder feed system, the electrostatic spray gun, the gun control unit, the grounded work piece and finally the flux recovery system.

The advantages of such a system over conventional wet fluxing are evident. Since the flux is applied dry, there is no need to prepare flux slurries, hence no need to monitor flux slurry concentrations. There is also no wastewater generated therefore more environmentally friendly. The dehydration or dry-off section of the furnace may be eliminated since the heat exchangers enter the furnace already dry. However, one must keep in mind that this is a relatively new fluxing technique and there are some minor drawbacks. Flux adhesion is not as good compared to that of wet fluxing. The flux also tends to accumulate on the leading edges of the heat exchanger and because of the Faraday cage effect, may have some difficulties in coating into corners or more specifically, in tube to header joints.

Powder Feed Systems
Presently, there are two types of powder feed systems on the market. The first type begins with the flux being fluidized in a hopper. Dry compressed air is fed through a porous membrane in the bottom of the hopper. The air rising through the volume of flux makes it behave like a fluid since the powder is essentially diluted with air. A pick up tube attached to an air pump is extended in the fluidized flux. Powder flow is then regulated by controlling the air-flow to the pump which is then delivered through the feed system to the spray gun. This type of feed system works perfectly well for powder paints. However, the flux has very different physical characteristics than powder paints (particle size, morphology) and so is difficult to fluidize. This must be taken into consideration when the manufacturer designs a powder feed system that relies on fluidization.

Dry Fluxing – Mechanical Flux Transport

The second type of powder feed system works on the principle of mechanical delivery or positive displacement. This means that the powder feed rate to the air pump is controlled by a screw or auger. The flux is contained in a main feed hopper and delivered mechanically at a controlled feed rate to the air pump. Powder flow is thus regulated by controlling the auger feed rate. This powder feed system does not rely on the flux being fluidized. Nonetheless, modifications over conventional mechanical powder feed systems are still necessary to overcome the differences between the flux characteristics and conventional powder paints.

Dry Fluxing – Powder Fluidization

Japanese heat exchanger manufacturers have used the technique of dry fluxing for many years now. Within the last few years, North American and European manufacturers have also installed electrostatic fluxing stations. Experience with this technique is being accumulated at a rapid rate, given that the equipment manufacturers and flux suppliers are taking an active role in improving the technology.